 I love pretty prairie clothes. I love things that are simple and homespun with a bit of a rough edge. So I thought now that spring was coming and skirt weather was nigh upon us…I needed a petticoat! The shabbier and tattier and prairier the better. And when I came across this petticoat tutorial from AlisaBurke, I knew I’d found just the thing to make!
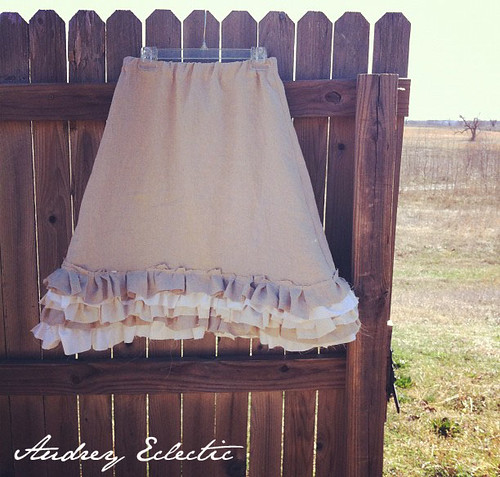
Now, I pretty much managed to not follow her directions very well. But I got the gist of what she was trying to do and I think it sewed up pretty well. I love that the petticoat is made up of all tattered edges on the ruffle, so it was meant to be rough and cut down a lot of time that might have been spent hemming edges (me? hem dozens of feet worth of edges? Ba!) I did use the outline of a skirt I already had on hand to make the rough form of it. And although her tutorial doesn’t really give a lot of information on how she put the base form of the skirt together, I used this crazy simple pattern for making and adding an elastic waist to a skirt from Oliver + S. It’s the pattern from which I’ve made all Audrey’s skirts and it’s so simple, I love it. I used the same idea to put in the waistband and base hem of the petticoat and when that was done I just added the rough ruffles.
 Here is a photo of the petticoat under the linen skirt I based the pattern off of. Another difference in my petticoat is that the base is made of linen, which is sturdier than the muslin used in the tutorial, and I added some linen into my ruffles.
 Here is a photo of the petticoat under the linen skirt I based the pattern off of. Another difference in my petticoat is that the base is made of linen, which is sturdier than the muslin used in the tutorial, and I added some linen into my ruffles.
 I’m going to make Audrey a mini one to wear under her skirts, and I know she’ll be adorable! I’m very pleased to have made a Mama-sized skirt now. I hope I can make more things for myself, and tailor them to my own personal style. I’m glad to have it finished, and my family probably is too! I have a habit of making a terrific mess when I sew. Who knew?
Anyhow…hope you like it! Now I need to start painting again!~
H


Leave a reply to Briana Shepley Cancel reply